


The Right Setup Is the First Step to Getting Clean Flares
When working with tubing that carries refrigerant, gasoline, water, or compressed air, accuracy is very important. A little flaw at the end of a line can turn into a slow leak, a loss in pressure, or a callback that makes you angry. That’s why many trades treat flaring as a “measure twice, cut once” task: the connection is only as strong as the flare you make.
A pipe flaring tool makes a smooth, even flare that fits snugly against a fitting. The joint will seal properly and tighten uniformly if the flare angle stays the same and the surface is clean. Even a brand-new fitting can have trouble holding pressure if the flare is bent, too thin, or fractured.
Where People Often Use Pipe Flaring Tools
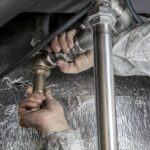
Flaring is a common part of many vocations in the real world. HVAC and refrigeration technicians flare copper lines for a lot of typical fittings. Some automotive systems include flared lines, and some workshop builds use flared connectors to make plumbing runs that are small and easy to work on. The purpose of Pipe flaring tool is the same in each case: to shape the end of the tube so that it fits with a cone surface and makes a tight seal when torque is applied.
Flaring is hard since tubing can act differently depending on what it’s made of and how thick the walls are. Softer copper can flare readily, but it’s also simpler to overwork. Harder materials may need more force and greater alignment. A decent tool helps keep the tube centred and supported so that your lips don’t end up uneven, with chatter marks, or flare faces that won’t sit flat.
Important Things to Look for in a Tool
Not all flaring instruments are made the same way, and you can see right away how good the flare is. A robust clamping bar is crucial because it keeps the tube from slipping as the pressure rises. If you slip, the flare can be too short, uneven, or have a score on the edge. Find a clamp that holds the tube tightly without breaking it.
Another important feature is alignment. Tools that keep the cone in the middle lower the risk of “one-sided” flares that leak even after they are tightened. The smoothness of the cone’s motion is also important. A well-machined cone makes a cleaner flare face, which is where sealing happens. You may often detect spiral lines or thin patches on the cone that are weak regions if it is rough or unsteady.
Ease of use is also important, especially if you flare a lot of lines in one day. Handles that are easy to hold, a solid base, and clearly indicated size locations help you get your work done faster while still being accurate. Some sets come with adapters for different tube sizes, which is useful if you constantly vary between jobs and materials.

Advice for Better Flares and Fewer Leaks
No matter how good the tool is, it won’t help if you don’t prepare. Begin with a clean, square cut. If you cut at an angle, the flare may not form uniformly. Gently deburr the edges on both the inside and outside. Sharp burrs might break the flare as it grows. Next, check that the tube is at the right height in the clamp. If it sticks out too much, the flare will be too thin; if it sticks out too little, the flare will be too short and won’t fit well.
A small quantity of lubricant on the cone (only if it’s right for the purpose) can assist it slide and stop galling, which will make the flare face smoother. Instead of pushing it hard, apply pressure steadily. Check the flare after it has formed. It should be symmetrical, have a smooth face, and no obvious splits. It’s usually faster and safer to cut and redo than to “hope it seals” if you discover cracks, deep grooves, or an uneven lip.
Lastly, don’t tighten the fitting too much. A lot of leaks happen when you twist a good flare too much. A well-made flare should seal without too much force, especially if both surfaces are clean and fit together precisely.


Leave a comment